What are Groups?
You can use purchasing Groups in your Amazon Business account to easily organize purchases into tracking categories. This is perfect for companies who want to keep their purchases separated by department.
What does this mean for me?
Once Groups have been created in your Amazon Business account then all you will need to adhere to one easy new rule: The entire contents of each shopping cart should conform to one of the Groups.
For example, if your company has created groups for Food and Project Supplies and you need to order food and project supplies on the same day, simply:
Create a shopping cart containing only items belonging in the group Food by clicking Save for later on all of the project supplies that may be in the shopping cart.
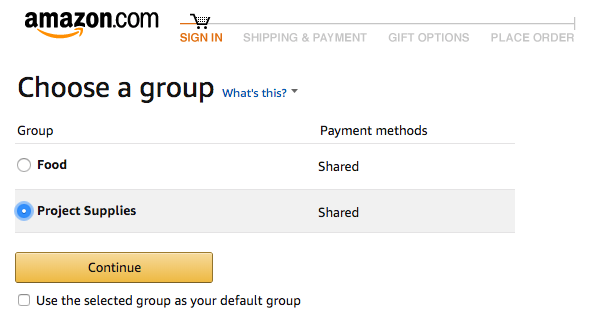
Then complete the check out process by selecting the Food group when presented with the Choose a group screen (see image below).
After the purchase of food is completed return to the shopping cart.
Move the saved project supplies into the cart.
Check out and select Project Supplies from the Choose a group screen during check out.
Now all purchases have been separated into groups or "tracking categories" that your bookkeeper can easily see.

But I do not have an Amazon Business account :(
No worries. Amazon Business Accounts are free and come with a whole set of business tools that help yo organize your data. We won't be able to categorize your purchases without one so please create one today :)
Ok, I have an Amazon Business account, now what?
Awesome! Grant us access by giving us your admin user name and password. You can do this by:
Creating or uploading a text file in your Box.com *Inbox
Sending us a onetimesecret.com secure link
Sending a carrier pigeon or raven (if using this method, please send the password and user names on separate birds)
Once inside we will complete the numinous complicated and intricate steps to add groups to your organization. Of course, you could also perform these on your own but it is much easier for us to do it for you. If you prefer not to give us your admin login we will still need to be added as a user so we can access the order reports.
In the example below our business orders food and project
1. Under Your Account for Business, select Manage Your Business.

2. Select Groups from the menu to the left.

3. Select Add a Group, enter the Group name and click Shared payment methods and addresses if the credit card(s) on file should be shared by the members of this group. More about adding members and payment methods later...

4. Add your second group named "Project Supplies." Your Groups screen should now look like this:

Part 2: Adding Group Members
1. We'll now click into each group and add Members. Click into Food and then click the "Add People" button.

2. Here you'll add a group member's email address and assign a role to that order maker. For admins, click both "Administrator" and "Requisitioner."

3. While clicked into your "Food" group click "People" on the menu to the left to see which users are in this group. Your users will need to accept their invitations before they show up here.

4. We have added two Admin users to the group "Food." You can edit this user's roles by clicking "Actions."

5. Repeat steps 1 through 3 to add users to your "Project Supplies" group.
Part 3: Adding Shipping Addresses
You'll need to add authorized shipping addresses to each group.
1. While within each group select Shipping addresses from the left menu then click "Add an address" or "Import address from your account" to use a mailing address already stored in your Amazon account.

Part 4: Add Payment Method(s)
To allow for purchasing you must update the payment methods within each groups settings.
1. Click into group "Food", click "Payment Methods", and then click the "Add Payment Method" button.

2. You'll be asked to enter the payment method. Enter the data and follow the steps.

3. Your Payments screen should now have a card listed and your team members with access to shared payment methods will be able to create orders.

Note: Groups can be set up to allow individual payment methods or shared payment methods. If a group uses shared payment methods, administrators set up shared payment methods and shipping addresses that are available to all users when purchasing on behalf of the group.
Approvals can be required or optional for an entire group. If approvals are required for a group, all users in the group are required to get order approvals on a per-order basis, per the set spending limit.
Part 5: Using the Groups
So now that we have groups added we will need to adhere to any easy new set of rules.
The contents of each shopping cart should conform to the group we intend to use at checkout. So, if a user needs to order food and project supplies on the same day the user will create a shopping cart containing only items belonging in the group "Food" (a user can easily click save for later on all of the project supplies that may be in the shopping cart).
The user will then complete the check out process choosing the "Food" group when presented with the "Choose a group" screen. Return to the shopping cart and purchase the project supplies choosing "Project Supplies" from the group menu during check out...